A flyer might be attractive and high quality, but lacking in the way the message is being perceived or received by the public.
There is more to designing a professional flyer or poster than the design tool or how enticing it appears. It’s about having a process that produces designs that effectively communicate to the right audience. Let’s start by defining what a flyer is.
What exactly is a flyer?
A flyer is a small-format printed advertisement or promotional item that conveys information about an event, product, service, or organization. Flyers are commonly distributed by hand, posted in public places, or included in mailings to reach a specific audience. Flyers can be used for different purposes, including promoting concerts, sales, fundraisers, community events, business openings, and political campaigns.
Flyers can be referred to by several other names, depending on their purpose, design, or context. Some people usually interchange the term flyer with handbills, leaflets, circulars, or pamphlets.
So what does it take to create professionally-looking flyers that are not templates?
A process!
It is tempting to visit Canva and use a ready-made template. But what if you want to design from scratch and still produce results that look professional?
Take an example of designing a flyer for sensitization on diabetes. You don’t jump to your software and start designing! As a problem-solver, use your visual communication skills to provide a solution. There are several things to consider before, during, and after creating this flyer.
Remember, there is no set technique to observe when working on your promotional materials. Fortunately, I have a process that works for me, which I am happy to share with you.
Using this approach as your base ensures that you will produce an outstanding, professionally-looking flyer, using any good design tool you have already mastered.
Before designing your flyer:
Define goals/objectives.
Determine the purpose of the flyer. Is it for an event, promotion, sensitization, or information dissemination?
Get to know the target audience.
Understand who you’re targeting so you can tailor the design and messaging accordingly. For example, is your flyer for a female audience between the ages of 25 and 35 years? Or is your flyer targeted towards graduates or unemployed individuals?
Gather Content.
Collect all the necessary text, images, and other information you want to include on the flyer. Preferably, ask your client for content. They might have specific images that will fit perfectly into the message you want to convey. Also, ask them to hand over versions of their logo.

Sketch your layout.
Decide on a layout that complements your content. Ensure it has a clear hierarchy, with important information prominently displayed. Use paper and a pen or a pencil to sketch out your ideas
Choose your fonts and color scheme.
Select legible fonts, that complement your client’s brand. Select a color scheme that is visually appealing and consistent with your client’s brand identity.
Remember to ask your client for their brand guidelines. A good guide typically has preset rules and information regarding logo usage, fonts, color palettes, messages, and the brand’s voice. These guidelines keep the brand’s messages consistent and cohesive across all mediums.
Setup your design canvas with the right settings.
Before diving into your design tool, make sure you know your deliverables:
- Will your flyer be distributed digitally or are you to print them?
- What is the size of the flyer? Is it a square, A6, A5?
- What resolution will be better suited for your design? The resolution may vary depending on the printers so don’t hesitate to communicate with the print house that will handle your designs. Also, some design tools come with presets so, use them.
Knowing your deliverables and setting the correct dimensions, resolution, and color mode ensures that your flyer will have a clear display, or print with optimal quality. Incorrect settings can lead to pixelation, color distortion, or blurriness.

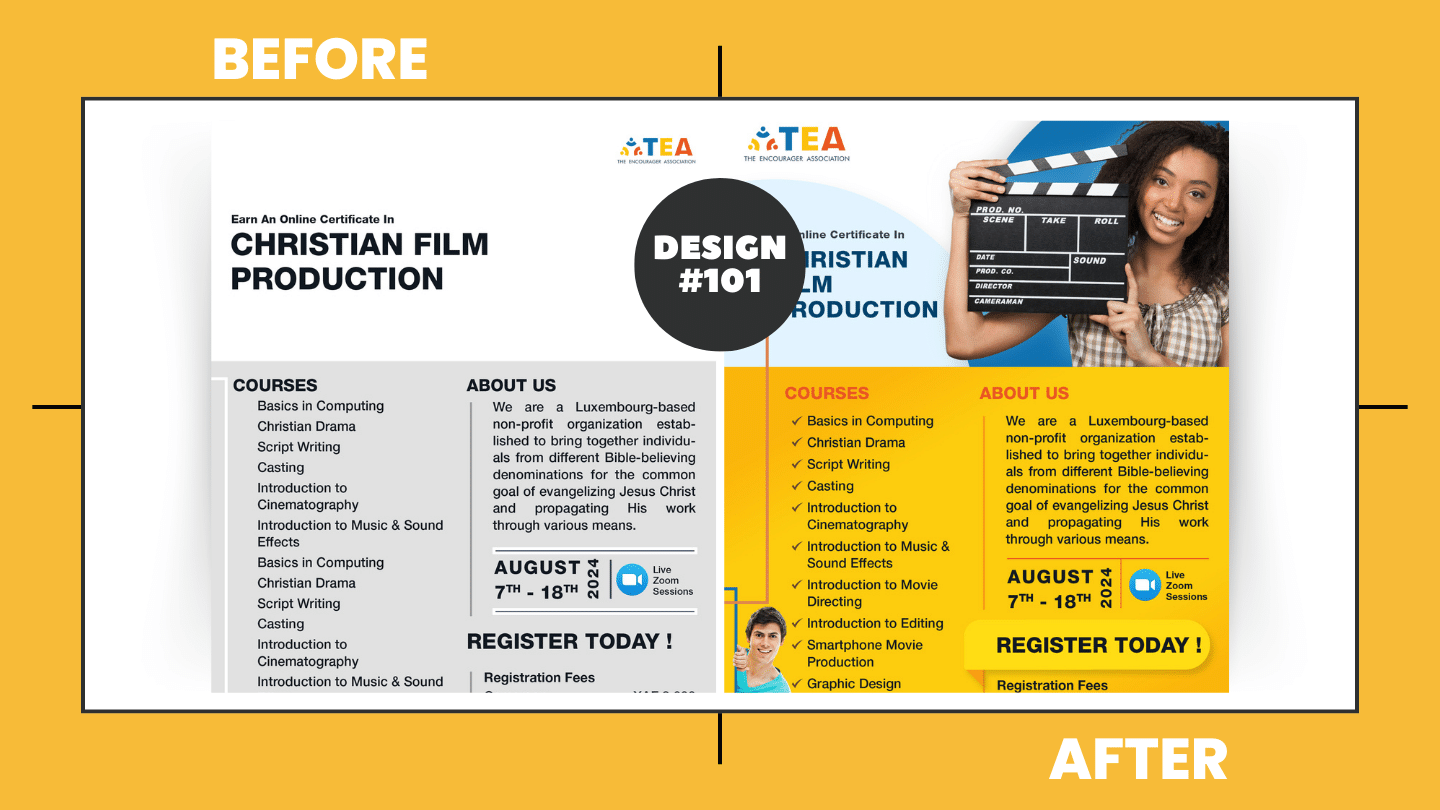
Create a Monochrome version.
Use the design tool of your choice to create a monochrome version of your flyer. Preferably, with dark or grayish shades.
Upgrade to a graphics-filled version.
It’s time to incorporate your images and graphics. Use high-quality images and graphics that enhance the visual appeal and effectively convey your message—keeping in mind the principles of graphic design.
Create a Call to Action.
Encourage readers to take a specific action, such as attending an event or visiting a website.
A call to action (CTA) is a prompt or instruction that encourages the audience to respond or take action immediately. CTAs are usually straightforward, simple, and persuasive, leading the audience to the desired outcome. They often use actionable language, such as “Buy Now,” “Sign Up Today,” “Learn More,” or “Get Started.”
Proofread and Submit for Feedback.
Check for any spelling or grammatical errors. Ensure all information is accurate and up-to-date. Depending on your agreement with the client, you might create several color versions of the same design or completely different versions for the client to choose from. Send all proposals to your client for feedback. And please, insist on the client proofreading. You may have missed a letter, or number or entered the wrong spellings which could change the message entirely.
Print Test Copies.
Before finalizing, print test copies to check the colors, layout, and overall quality. And proofread again. You’d be surprised to notice an error that you, your client, or your team might have missed when designing or priorly proofreading.

Finalize and Print.
Once you're satisfied with the design, proceed with printing the final copies using high-quality paper and print methods suitable for your needs. Print files can be saved using PDF, TIFF, or PNG format with a resolution between 150ppi and 300ppi.
Make digital copies of your design if it will be shared online. These will be typically saved in webP, JPEG, or PNG format at a resolution of 72ppi. Deliver final versions to your client: print and web Versions.
Remember, simplicity and clarity are key in flyer design. Keep the design clean and focused on the main message to ensure it resonates with your audience.